Monday, August 20, 2012

Starry nights...


I was having quite a boring day and I was literally staring out of the window at the night sky and my thoughts went to Van Gogh's starry nights painting and I felt I just HAD to try it on my nails!

Use a robin blue coloured nail polish as the base and don't let it dry before adding the patches of white and yellow nailpolish on it.
I added the black flame-like detail only on my ring-finger. You can make Van Gogh's signature strokes with a pin or a toothpick (the safer option) just to give that real Van Gogh effect. Try doing this before the different layers of pain dry so you end up getting a few light blue tones as well.
Cover it up with a coat of clear nail polish to seal in your design as well as to give it a smooth-ish texture!


Blue nailpolish,Van Gogh,painting,nail art


These are the shades of blue and yellow that I used. They look quite amazing together don't they?


Friday, August 10, 2012

He loves me,he loves me not...


I'm sure everyone of us has been in this dilemma atleast once in our lives,if not more. And of course we all know the cliched lovesick person plucking out flower petals trying to decide based on pure luck or the Fibonacci sequence,whether the object of their affection does love them or not!
Either way here it is,on my nails! =)

I used the end of an unbent paper clip as a dotting tool and got a little sneaky by using a normal white-ink pen to make the petals.  If you cover it with a top coat,the pen ink does not crack or get wiped off! =D
For the green stem,I used my striper brush.


Love,Loves me,Loves me not,light blue,aqua,daisy,flower


Wednesday, August 8, 2012

Nail polish storage ideas

I usually just keep my nail polish and nail art in a plastic see-through pouch or box but I've become an organization junkie (pun intended) lately and found these four great ways to organize your stash! =)


Nail polish roll storage

You can get these nail polish storage rolls which can easily be rolled up and kept in a drawer in your closet or packed into your suitcase.  The rolls are made from faux leather and come in a variety of colours. Each roll fits 14 nail polishes.


Nail polish box storage

Now this one is mainly used for storing beads and such but you could just as easily store your nail polish in them as long as the cap isn't too long. Even if that is the case, you could easily just use these as drawer dividers,and toss the lid. The handle on top makes it easy for you to carry your collection around. 


Nail polish box drawer storage
Plastic drawers like these are easy to use as well and can fit any size of nail polish bottles since some companies make their bottles really big and chunky.


Nail polish drawer storage cardboard cheap
If you're a little low on cash or just don't want to spend too much,you could try making your own drawer dividers with cardboard. Measure out your drawer and the space required for your chunkiest bottle of nail polish. Then with some simple calculations you can create your own drawer divider!


I personally don't like nail polish racks because they're not too portable and cant be kept away from sight if you have kids or pets that like to mess around your room.


Nail art: Olympics 2012


I LOVE the fact that not only are these girls working through difficult practice schedules while kicking some Olympian ass, but are staying stylish while doing so! 


                                      Olympic nail art


Missy Franklin USA olympic nail art

Missy Franklin U.S. swimmer sports the stars and stripes

British archer Amy Oliver olympic nail art

British Archer Amy Oliver wears the Union Jack proudly on her nails!


Luz Mercedes Acosta Valdez British Mexican olympic nail art

Luz  Mercedes Acosta Valdez sports both the British as well as Mexican flags on her nails


Serena Williams USA olympic nail art

Serena Williams with her fun nail art!

Jessica Fox Australia olympic nail art
  

 Jessica Fox to the left sporting Australia’s flag and a cute kangaroo.


Angelique Kerber German olympic nail art

Angelique Kerber a German tennis player rocking her country’s colors.
Rebecca Adlington Britain olympic nail art


Britain's Rebecca Adlington

Emily Seebohm Australia olympic nail art


Emily Seebohm, Australia

Scotch Tape Nail Art! Easy and exciting!


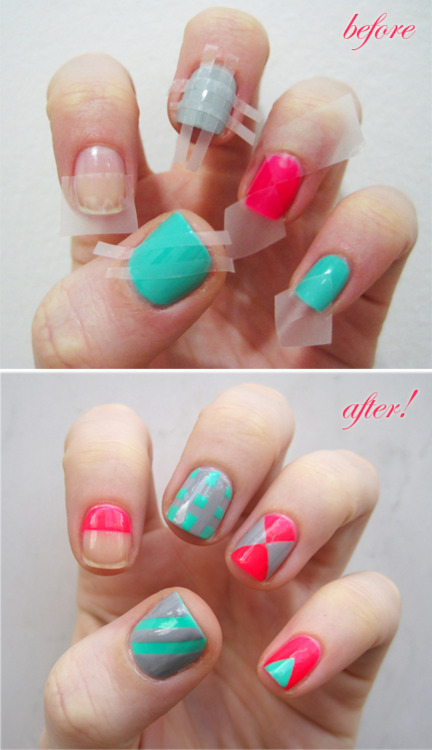
If you have a tough time creating straight lines with your striper brushes,say hello to your new best friend: Scotch tape! You can cut it into any geometric shape you want to create straight lines on your nails. Here are a few ideas to get you started!
  • Its best to do this on day-old nail paint so that its completely dry and doesn't come off along with the scotch tape. But if you really have to do it on day one,then give your base colour an hour's drying time."

  • Cut Scotch Tape to the desired size and shape, and apply firmly to the nail. Run another nail along the edge of the tape to assure a tight seal. You don’t want any polish to run underneath the tape as you paint!
  • Fill in the stenciled area with a contrasting shade of polish, and slowly remove the tape while the polish is still wet.
  • Allow the polish to dry completely so the colors don’t smear into each other, and then finish off with a good top coat.


Scotch tape nail art tutorial


Another super way to use scotch tape is by applying nail paint on the non-sticky side of the scotch tape,waiting for it to dry and then cutting it out into the shape you want and just sticking it onto your nails! The tape merges with your nails and looks like plain nail polish on your nails! Apply a top coat to seal in your design.


Scotch tape nail art tutorial

You can do this design with normal scissors or you can even use craft scissors which have different shaped blades.

Other nail art designs you can try using scotch tape:


Scotch tape nail art designs


Scotch tape nail art designs


Scotch tape nail art designs


Scotch tape nail art designs


Scotch tape nail art designs

HAVE FUN! =D